Showing posts with label headband. Show all posts
Showing posts with label headband. Show all posts
Monday, March 3, 2014
Rhinestone Cat Ears
Seriously the cutest thing I have come up with! I've seen so many young women walking around with these cute cat ears...but in a plain fashion. Well, we all know plain just wont do, so I added colored rhinestones to the mix! Ta-da! I have rhinestone cat ears. The 28 gauge wire I used is very flexible and easy to work with. If you're just bumming around the house, this gauge wire will work well for you. If you head rocking, ear knocking kitty...you might want a thicker wire to make your ears with. You're PURR-fect, meow.
Thursday, August 2, 2012
Rhinestone Headband
When I got the sparkle home, I was itching to cover something in rhinestones. This is one of the ideas I came up with.
Very simple Sparkle headband
- Felt
- Glitter Glue
- Headband
- Rhinestones
- Exacto knife or small scissors
 |
| Glue rhinestones on to felt in a haphazard, organic shape. |
 |
| Cut around rhinestones and similar shaped felt for rhinestone backing. |
 |
| Apply glue to wrong sides of felt and then sandwich headband between felt . |
 |
| When glue is dry, trim around rhinestones with Exacto knife |


Princess For a Day...Everyday!
Sunday, April 10, 2011
Wearing School Spirit-Part 2
School spirit runs strong in the small town I live in. So, when I noticed my athletic wear was hardly communicating, "Number #1 Fan", I knew I had a problem. I could have gone and purchased another carbon copy tee, but that's no fun. I wanted something that conveyed MY spirit for the school. And, that is why I decided to fashion my own "trendy" headband.
The headband would need to cover the three elements: sass, spirit and SEQUINS. As I began to design, I realized I could add one more element- the switcheroo. Yep, at some point even the most dedicated fanatics return to their civilian lives. Hence, the creation of the school spirit handband...cover.

This project is a quick DIY and very kiddo friendly. You take your standard, plain headband and measure it from end to end. I used a 1/4 in. width headband, but you could make a cover for almost any width headband. Once you have your measurements, add your seam allowances (a quarter inch to the width, and a half inch to the length). Transfer new adjustmest to colored felt and use your Fiskars scissors to cut the pattern out.
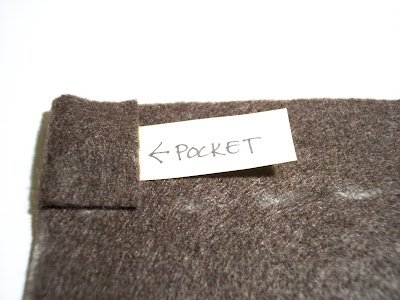
You will notice from the pictures below that I included a small pocket at one end of the cover (this is to keep the headband in place during wear).

Glue remaining edges (excluding the pocket side). I used fabric paint to write with and my Fiskars fingertip tweezers made adding sequins a breeze.

The covers slip on and off easily. You can make matching covers for your friends and family or make covers to match your outfits, there are endless possibilities. One of the better options is wearing the cover alone! Once you cross the ends and safety pin the middle, you have a great spirit pin!
The headband would need to cover the three elements: sass, spirit and SEQUINS. As I began to design, I realized I could add one more element- the switcheroo. Yep, at some point even the most dedicated fanatics return to their civilian lives. Hence, the creation of the school spirit handband...cover.


This project is a quick DIY and very kiddo friendly. You take your standard, plain headband and measure it from end to end. I used a 1/4 in. width headband, but you could make a cover for almost any width headband. Once you have your measurements, add your seam allowances (a quarter inch to the width, and a half inch to the length). Transfer new adjustmest to colored felt and use your Fiskars scissors to cut the pattern out.

You will notice from the pictures below that I included a small pocket at one end of the cover (this is to keep the headband in place during wear).


Glue remaining edges (excluding the pocket side). I used fabric paint to write with and my Fiskars fingertip tweezers made adding sequins a breeze.


The covers slip on and off easily. You can make matching covers for your friends and family or make covers to match your outfits, there are endless possibilities. One of the better options is wearing the cover alone! Once you cross the ends and safety pin the middle, you have a great spirit pin!

Subscribe to:
Posts (Atom)