I recorded a video showing most of the stuff I made in the month of March. I a lot of small stuff! I even started to bead, again. The beading project didn't end well, however. I mention in the video about how the finished beaded product came out looking like small broom and that I didn't want to wear two brooms on my ear, so only one earring was made. Don't you just hate a project that doesn't transform in to craft gold!? Maybe I can attach the broom to a mixed media piece of some sorts. Anyways, in the craft haul you'll see my regular polymer clay stuff, along with some resin and a dash of jewelry making. I made this awesome shadow box that I forgot to include in the video...that pic is on my instagram. I hope you enjoy the video! I haven't started crafting this month...but am really looking forward to getting started, already!
Youtube Video HERE
Showing posts with label craft. Show all posts
Showing posts with label craft. Show all posts
Wednesday, April 9, 2014
Monday, February 3, 2014
Bacon Roses
Wednesday, January 29, 2014
Heart Monster
The Heart Monster is back! I made this cute guy last year and was so in love with his design that I decided to bring him back for this years Valentine's day. The heart monster is so easy to make that if you're a beginner with polymer clay, no probs...this is a craft for you. If you want the written to directions to the tutorial click link here. However, this year I have made a visual of the tutorial. Enjoy your little heart monster because no matter who or WHAT you are, everyone needs a lil' love.

Friday, January 24, 2014
Pretzel Heart Necklace


Saturday, January 11, 2014
Recycle Gift Cards in to Book Mark
For Christmas, I got some gift cards. I love gift cards but when the value is spent, what do you do with the card? It just seemed like such a waste to throw the card award but if not tossing it, what do I do with it? I came up with a way to turn the spent gift card in to a useful book mark. This project was very easy. Recycle spent gift in to a book marker


Wednesday, January 8, 2014
Sunday, April 22, 2012
Using a tool in a new way
I was using my Fiskar's paw paper punch, with light and dark blue cardstock. With each punch, five, small ameba shaped paper debris littered my work space. At the end of my punching fiasco, I had a considerable amount of debris to pick up and throw away. But instead of throwing the scraps away, I found an innovative way to use them!

 I love finding a new use for a tool. Not only do I feel like I've added a new wrinkle to my brain, but that creativity knows no limit!

Following a (loose) rule of gluing down one light colored spot for every two dark spots, I was able to create a print like that of a lepoard's fur.


Monday, April 2, 2012
Normal Craft- Easter Card Puggy Bunny
I have a pug calendar that reveals a new pug for every day of the year. I enjoy EVERY picture of each pug shown so much, that I find it impossible to throw ANY of the pictures away. This is one of the ways I was able to use my stash of pug mugs.
What I used:
10" X 7" Purple cardstock.
4" X 7" Sky blue cardstock.
3 1/4" X 2" Hay colored cardstock.
Scraps of white and pink card stock (for bunny ear band).
1/4" & 1/8" width ribbon in various colors.
10" X 1 1/2" green velum.
Double stick tape, glitter, glue, scissors and 2 types of shears (pinking and cloud)
1" X 7" decorative paper border.
Flower accesories.
1. When choosing a pug mug, I looked for a picture that had a clear, forward shot of the dog. I then cut the dog out.
 2.I sketched a couple of ears (from white cardstock), little headband(from pink cardstock) and a basket (hay colored cardstock). I kept my basket small, but big enough for my pug and for FOUR rows of weaved ribbon (approx. 3 1/4 X 2 inches). I Cut shapes out. For added dimension, I used cloud shaped shears on the baskets' edge and I added color details with colored pencils and covered the bunny ears with glitter.
 3. On the back of my basket, I made slits (according to picture below) with a blade. I used alternating ribbon colors to weave thru slits and held ribbon in place with double stick tape..

 4. I glued the bunny earband on the pug and then taped my pug pic to the basket and arched approx. 6" of ribbon over pug/basket to make the basket handle.
5. I cut my velum strip in half making two 5" X 1 1/2 pieces. I used pinking shears to make a decorative edge at the top of the velum strip. I used scissors to cut in to the strip, to make individual blades of grass.* I found that shaping the tips of the blades was a bit easier using the aide of a finger nail clipper.
4. I glued the bunny earband on the pug and then taped my pug pic to the basket and arched approx. 6" of ribbon over pug/basket to make the basket handle.
5. I cut my velum strip in half making two 5" X 1 1/2 pieces. I used pinking shears to make a decorative edge at the top of the velum strip. I used scissors to cut in to the strip, to make individual blades of grass.* I found that shaping the tips of the blades was a bit easier using the aide of a finger nail clipper.
 6. Glue works ahead! With sky blue cardstock ready to go, I pasted down green vellum grass. I then snuggled my pug/basket in to my newly made grass, and pasted it down. Having already folded the purple card stock in half, making a card that measures 5" X 7", I pasted my sky/grass/pug scene onto the purple cardstock. To end, I added a paper border for flair on the card's right edge. Finally, I dotted the card with a few flowers.
 This card creation fits my crafting personality to a "T". Happy Easter from the Puggy Bunny!


Monday, April 11, 2011
Layer It by Ear-Part 3
Fiskars' has an amazing array of craft supplies. Today, I've chosen to take their circle paper punch and try to do a little something out of the ordinary with it. Take a look.

Punching circles from various colors of cardstock, I then glued the circles one on top of another (*circle, glue, circle, glue, circle). After a stack of six circles, I applied a constant pressure and let dry. After drying, the tower is ready to cut in to. Designs are one of a kind and very tempermental to pressure, angle and slides of hand. After I got my desired look, I added varied embelishments to compliment the paper work. Earring hooks were added, the craft is very wearable.


*All cuts are made with the detail tool, and the partial holes were made using the craft hand drill.
Sunday, April 10, 2011
Wearing School Spirit-Part 2
School spirit runs strong in the small town I live in. So, when I noticed my athletic wear was hardly communicating, "Number #1 Fan", I knew I had a problem. I could have gone and purchased another carbon copy tee, but that's no fun. I wanted something that conveyed MY spirit for the school. And, that is why I decided to fashion my own "trendy" headband.
The headband would need to cover the three elements: sass, spirit and SEQUINS. As I began to design, I realized I could add one more element- the switcheroo. Yep, at some point even the most dedicated fanatics return to their civilian lives. Hence, the creation of the school spirit handband...cover.

This project is a quick DIY and very kiddo friendly. You take your standard, plain headband and measure it from end to end. I used a 1/4 in. width headband, but you could make a cover for almost any width headband. Once you have your measurements, add your seam allowances (a quarter inch to the width, and a half inch to the length). Transfer new adjustmest to colored felt and use your Fiskars scissors to cut the pattern out.
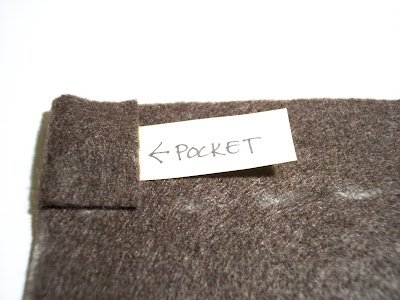
You will notice from the pictures below that I included a small pocket at one end of the cover (this is to keep the headband in place during wear).

Glue remaining edges (excluding the pocket side). I used fabric paint to write with and my Fiskars fingertip tweezers made adding sequins a breeze.

The covers slip on and off easily. You can make matching covers for your friends and family or make covers to match your outfits, there are endless possibilities. One of the better options is wearing the cover alone! Once you cross the ends and safety pin the middle, you have a great spirit pin!
The headband would need to cover the three elements: sass, spirit and SEQUINS. As I began to design, I realized I could add one more element- the switcheroo. Yep, at some point even the most dedicated fanatics return to their civilian lives. Hence, the creation of the school spirit handband...cover.


This project is a quick DIY and very kiddo friendly. You take your standard, plain headband and measure it from end to end. I used a 1/4 in. width headband, but you could make a cover for almost any width headband. Once you have your measurements, add your seam allowances (a quarter inch to the width, and a half inch to the length). Transfer new adjustmest to colored felt and use your Fiskars scissors to cut the pattern out.

You will notice from the pictures below that I included a small pocket at one end of the cover (this is to keep the headband in place during wear).


Glue remaining edges (excluding the pocket side). I used fabric paint to write with and my Fiskars fingertip tweezers made adding sequins a breeze.


The covers slip on and off easily. You can make matching covers for your friends and family or make covers to match your outfits, there are endless possibilities. One of the better options is wearing the cover alone! Once you cross the ends and safety pin the middle, you have a great spirit pin!

Subscribe to:
Posts (Atom)