Showing posts with label girlie. Show all posts
Showing posts with label girlie. Show all posts
Monday, March 3, 2014
Rhinestone Cat Ears
Seriously the cutest thing I have come up with! I've seen so many young women walking around with these cute cat ears...but in a plain fashion. Well, we all know plain just wont do, so I added colored rhinestones to the mix! Ta-da! I have rhinestone cat ears. The 28 gauge wire I used is very flexible and easy to work with. If you're just bumming around the house, this gauge wire will work well for you. If you head rocking, ear knocking kitty...you might want a thicker wire to make your ears with. You're PURR-fect, meow.
Thursday, August 2, 2012
Rhinestone Headband
When I got the sparkle home, I was itching to cover something in rhinestones. This is one of the ideas I came up with.
Very simple Sparkle headband
- Felt
- Glitter Glue
- Headband
- Rhinestones
- Exacto knife or small scissors
 |
| Glue rhinestones on to felt in a haphazard, organic shape. |
 |
| Cut around rhinestones and similar shaped felt for rhinestone backing. |
 |
| Apply glue to wrong sides of felt and then sandwich headband between felt . |
 |
| When glue is dry, trim around rhinestones with Exacto knife |


Princess For a Day...Everyday!
Wednesday, April 4, 2012
Out of My Zone- Eye Patch
Recently, my friend's Doctor perscribed her an eye patch to wear. Its black, bulky look was none too pleasing to my friend, nor was the fit. Feeling sympathetic to her situation, I asked her if I might try and make her a patch more "fitting" to her style and needs. She complied and willingly gave me one of her current eye patches from which to make a pattern from. I disassembled her original patch and laid it out on thick, recycled card stock. I traced around it and and cut it out--making myself a pattern.
 I decided that two pattern pieces were needed so that any raw edge of fabric could be hidden within the patch. That being said, I traced and cut out two patches from cardstock. To make the concave nature of the patch, I cut the marked center line, making a flap. The flap got pulled over and tacked with glue.
 I held the flap in place with a clothes pin until I was sure the glue was dry. Once dry, I sprayed the exterior of one patch and the interior of the other, with spray adhesive. The spray glued areas had an up-cycled cardigan stretched over (or pressed in to) patch. A rough cut seam of approx. 1/8" of fabric was left around cardstock. I used my Tombow Mono Multi glue to go around the very exterior cardstock. When the Mono Multi glue dries, it's very tacky. Those raw fabric edges got turned in to the Mono glue, leaving beautiful finished edges.
 I attached one 16 1/2" piece of elastic to both edges of patch and sandwhiched everything together with a strong, clear, flexible glue.
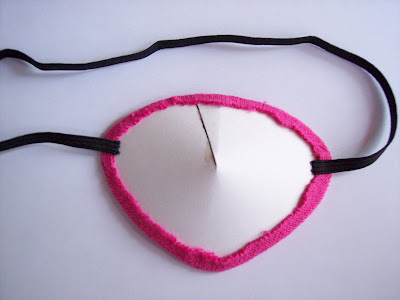
 The eye patch came out better than I ever expected, but more importantly, my friend LOVES it!
P.S. Since making the first eye patch, I've successfully made more eye patches from felted cashmere, felt and even silk! Trying something new, can be very rewarding in several aspects.
The eye patch came out better than I ever expected, but more importantly, my friend LOVES it!
P.S. Since making the first eye patch, I've successfully made more eye patches from felted cashmere, felt and even silk! Trying something new, can be very rewarding in several aspects.


Subscribe to:
Posts (Atom)