Wednesday, June 23, 2010

Sometimes, U Just Gotta Paint

Sometimes I just get an itch to paint something. I'm not talking about painting renior-esqe masterpieces on canvas; I'm talking about slapping some paint on something!

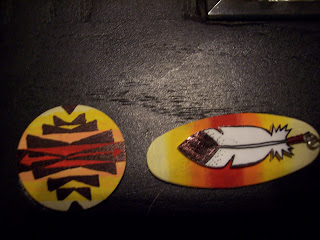
The victim to my paint--random sized, various shape wood cut-outs.
No paint brushes for this project, just cotton swabs.
A BLACK Sharpie
Masking Tape
Lots of Acrylic Paint

I didn't start my project with a set outcome, just kinda wanted to play around with some techniques. Because I really like Pendalton blanket colors, I wanted to get some of those designs and color on the wood.

The outcome was nice. To achieve the gradient effect, I simply taped around a section to be colored; let dry--and moved on to next color. To get the black detail, I used my black sharpie.

I'm not sure what the final outcome of these painted shapes will be, but I did think they might be nice as a background for something or maybe a fancy button for a bag.

Tuesday, June 22, 2010

Bead Dazzle

Although I spent a lot of time trying to clean up my craft room; I got side tracked on my cleaning efforts by uncovering some fantastic vintage beads. What to put some beads on???? Well, It just so happened that my mom gifted me a three pack of fabric covered headbands. They were plain pastel--screaming for interest. I've seen overpriced, beaded headband at the mall, and every time I see one I say, "I could EASILY make that." So, here's my truth behind the pudding. The pink band I decorated with a strand of vintage german crystals. The multi faceted colors really pop with the girly background. The baby blue band I am currently in the process of striping with opaque, solid blue beads. I really am amazed at the accessory power of beads.
To give a run down on how much you can save by embellishing your own head band.
Headbands pack of 3 already fabric covered - 1.49
Using random notions you already own- FREE
TOTAL- 1.49
Buying a pre-made band from JCrew(for instance)-- 16.00

Major savings for DIY....and save enough to buy enough headbands to match all outfits!

Sunday, June 20, 2010

For the Tooth Fairy

My brother's last dentist trip did not go so well. The ending result was a tooth pulled. I'm vain about teeth. I don't think I would be too out of line to say that many of us are. Lots of money goes in to a perfect smile. Although my brother wasn't too concerned about his recent loss; I couldn't get that tooth off my mind.
So, I did what I do best, make something. Instead of thinking about the tooth, I made a tooth. I bought a pack of white polymer clay and got to sculpting a molar. It was really quite easy. I cut the general shape, used an exacto knife for detail and smoothed the clay as to not leave finger prints. I baked the clay as required--and viola! Any rough edges I sanded down with fine sand paper. To share my toothy idea, I glued the tooth on to a tack and attached it to my jacket. I always receive the same comment/question, "Is that a tooth?" Admirers can get their own at sucrefille.etsy.com.
So today I asked myself, "What else can I do with this tooth?" Tooth, teeth, losing teeth, TOOTH FAIRY! A stylish container for a small tooth, for easy accessibility that all tooth fairies can appreciate. I took the a fore mentioned tooth (without tack), sawed the top off, hollowed it out and used an old clip earring as the flip top mechanism. I glued the clip earring on to the tooth top and inner bottom (making sure to match up the top with bottom.

A stylish tooth container is made! Since I've well past the age of collecting from the TF, I though the container fit for my pug's puppy tooth. Since not everyone is into keeping a small dog's tooth, the container is the perfect cover up.